
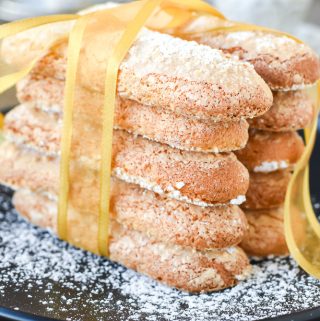
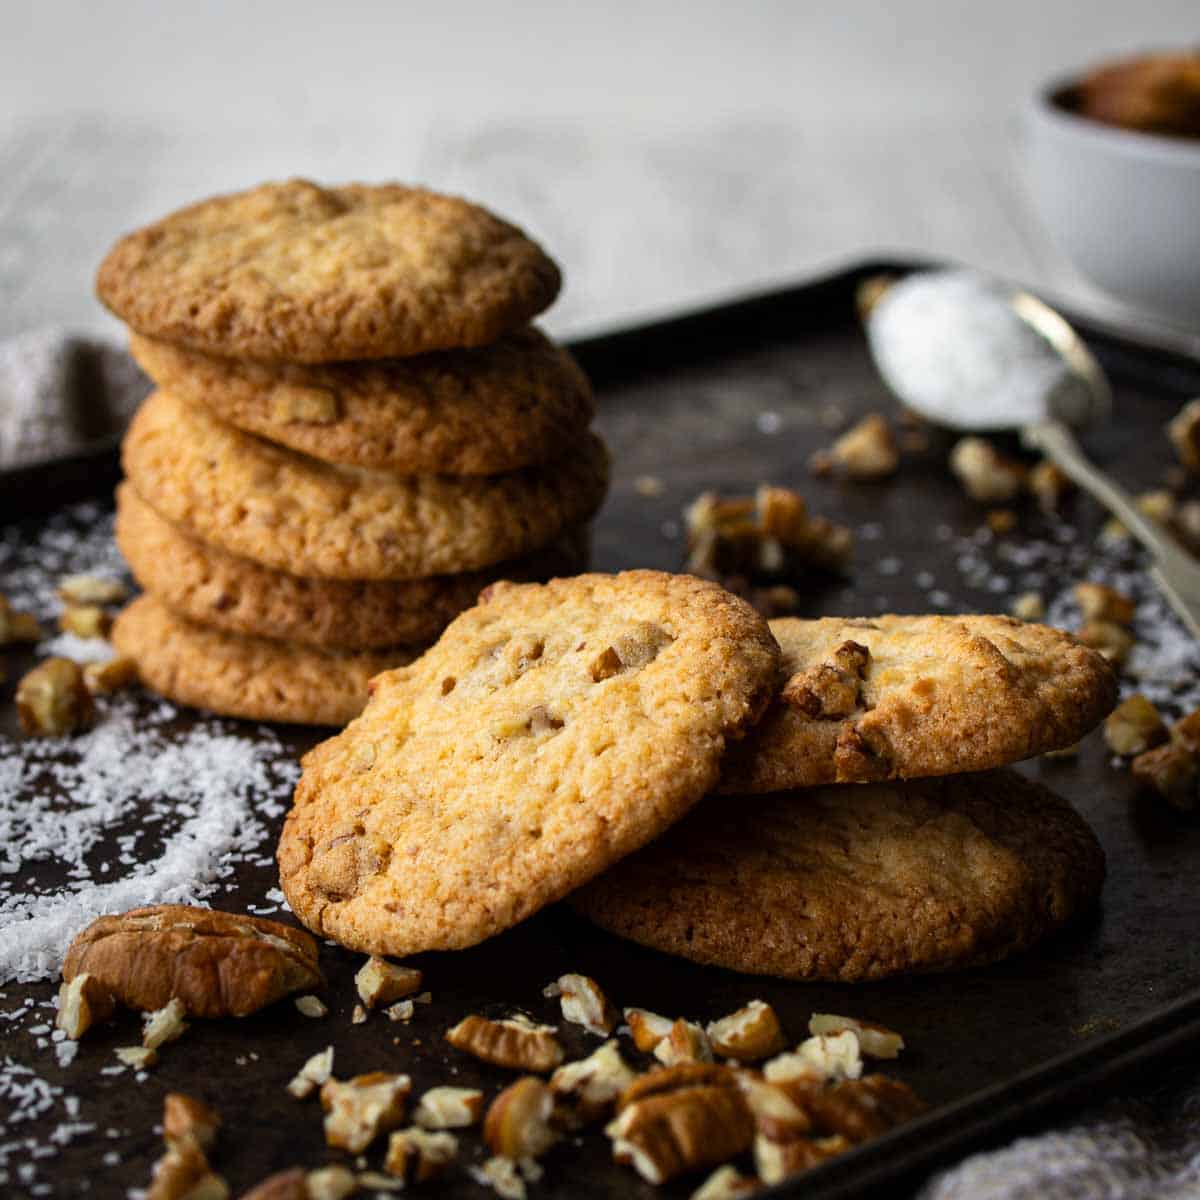
Savoiardi Cookies

Savoiardi Cookies are light, airy, and wonderful with an espresso or cappuccino.
But did you know that this Italian treat is actually quite easy to make at home with very simple ingredients?

You might know this Italian treat by another name – sponge fingers or even lady fingers, either way, you’ll love the taste of this homemade classic. I like to flavor these with a little vanilla extract and finely grated lemon rind. Just like many Italian recipes, the ingredients used to make this delicate Italian sweet are very basic – just eggs, sugar, flour, and flavorings.
Why you’ll love this recipe
Savoiardi Cookies are the basis of some of the most popular Italian desserts. These sponge fingers are an integral ingredient of Italian Tiramisu but also my Zuppa Inglese. I also like them for my super easy Tiramisu Cups!
This recipe makes soft sponge fingers which are delicious with a superior flavor compared to store-bought, savoiardi ladyfingers. Even though these cookies are soft, they will still stay intact when dipped in coffee or other liquids when you make a tiramisu, trifle, charlotte or other dessert.
Ingredients
You’ll need just the basic ingredients of eggs, sugar, and flour plus flavorings to make Savoiardi Cookies. However, it’s essential to separate eggs without getting any yolk into the whites. Any fat from the yolk will stop the egg whites beat up nice and fluffy.
There are a few ways to separate eggs easily but first start with cold eggs. Cold egg yolks are less likely to break.
- Use a little contraption called a ‘separator’ (very inventive name) which allows you to crack the egg into it. The yolk will be held in the little indentation while the egg white slips out into a waiting bowl.
- Use the shell to shell method which means cracking the egg and holding the yolk in one half allowing the white to fall into the bowl. Transfer the yolk from shell to shell until most of the white has dripped out.
- Use clean hands. Crack the egg into the palm of your hand and allow the white to slip between your fingers into the bowl.
Instructions
Homemade sponge fingers are just a sponge cake batter piped into small, easy to handle cookies.

- Beat egg whites with sugar until thick and glossy just like a meringue.
- In a small bowl, beat in the egg yolks with the very finely grated lemon zest and vanilla extract.
- Add the egg yolk mixture to the beaten egg whites.
- Lightly fold the egg yolks into the whites.

- Sieve the dry ingredients over the egg mixture.
- Fold the dry ingredients in carefully.
- Pipe the batter into lengths.
- Sieved powdered sugar over the Savoiardi cookies twice before baking to create the distinctive crust.
Hint: If you don’t have a piping bag you can use a plastic zip lock bag with the end snipped. Or just spoon the batter onto lined baking trays to make circular savoiardi cookies. They won’t be fingers anymore – sponge or lady – but will taste just as good
Storage
Store these savoiardi cookies (savoiardi biscuits or ladyfingers in some countries) in an airtight container for two weeks. At first, if haven’t dried them out completely they may seem a bit sticky however very soon any stickiness disappears.
To freeze, layer in an airtight container with non-stick paper between layers and freeze for up to a month.
Tips for Success

This recipe contains no baking powder. All the lightness comes from the air which is beaten into the egg whites and sugar. Take care when incorporating the dry ingredients. Use a gentle folding and mixing action so that the air is retained in the batter.
Here are the most important points.
- Use extra fine white granulated (castor) sugar that will dissolve easily.
- Beat the egg whites and sugar thoroughly to incorporate a lot of air.
- Fold the dry ingredients in lightly so as not to deflate the mixture.
- For dry, crispy savoiardi, dry out these sponge fingers by returning them to a cooler oven after baking. Just place the Savoiardi Cookies on baking trays and return to the oven overnight or until dried and crispy.
- If you live in a dry climate it might be possible to dry these cookies at room temperature on uncovered baking trays. Unfortunately, because the area I live in is humid and tropical, I can’t test this for you.
FAQ
This savoiardi biscuit (or cookie) recipe as it is written is not gluten-free. However, sponge batter can be made entirely with gluten-free cornstarch (cornflour). Just replace the plain flour with gluten-free cornflour for gluten-free sponge fingers
Savoiardi cookies are known as ladyfingers or sponge fingers.
There is no difference between savoiardi and ladyfingers. These light and air cookies are known by different names around the world. Savoiardi is the Italian name. It’s said that these cookies were created at the Duchy of Savoy (in the area of Piedmont, Italy) to mark a visit by the King of France.
Serving Suggestion

Of course, Savoiardi Cookies are an important component of many Italian desserts.
You’ll find that homemade Savoiardi Cookies are so delicious and much tastier than the store-bought variety. Along with pizzelle or biscotti, these are perfect served with a good coffee. Just put your feet up and enjoy!
Made this recipe?
Please let me know if you liked it by leaving a ★★★★★ star rating and a review below. And remember to subscribe to my newsletter – it’s free!
Savoiardi Recipe
Ingredients
- 3 eggs
- ⅓ cup (75 grams) white granulated sugar superfine or castor sugar is best
- ½ teaspoon very finely grated lemon zest lemon extract or lemon oil can be used
- 1 teaspoon vanilla extract
- ¾ cup (95 grams cake flour
- 2 tablespoons cornstarch wheaten cornflour is some countries
- pinch fine salt
- 6 tablespoons (50 grams) powdered sugar more as needed
Instructions
- Preheat the oven to 350°F/180ºC. Line two large baking sheets (or three small baking sheet with non stick parchment paper.
- Separate the eggs, putting the egg yolks into a small bowl for later.
- Beat the egg whites with an electric mixer with the whisk attachment until stiff peaks.
- Gradually add the sugar and continue beating until the sugar is dissolved and the mixture is thick and glossy.
- Mix the lemon zest and vanilla extracts into the egg yolks.
- Use a spatula to combine the egg yolk mixture with the egg whites until just incorporated.
- Sift the cake flour, cornstarch and salt over the egg mixture.
- Use a spatula to gently fold the dry ingredients in until just mixed. It is important to fold very gently to not to deflate the batter meaning that the savioardi would be flat and not as spongy. The mixture will deflate a little but that's fine – you've got a lot of air into those egg whites.
- Use a piping bag with a plain ½ inch (1.5cm) tip (or you could just snip the end off, or use a ziplock bag filled with the batter.
- Pipe the batter into 5 inch (12cm) lengths leaving space between each to allow for spreading.
- Sift half of the powdered sugar over the savoiardi and wait for 5 minutes. The sugar will melt and look wet. That’s what it’s meant to do.
- After 5 minutes, sift over the remaining powdered sugar. You may need a little bit more. Sprinkling with powdered sugar is what creates the characteristic crust of savoiardi.
- Bake savoiardi cookies for 10 minutes, then rotate the baking trays and bake for another 5 minutes.
- Allow to cool for 5 minutes then remove with a metal spatula while still warm and cool on a wire rack.
- Store in an airtight container.
For dry, crispy savoiardi similar to store bought
- This is what I do using an electric oven.
- Switch off the oven and allow it to cool down for two hours or until under 200°F (100ºC). Place savoiardi back on baking trays and return to the turned off oven overnight or until dried and crispy.
Notes
- Try to find fine, white granulated sugar that will dissolve easily. Granulated can also be whizzed in a food processor to create a finer sugar.
- Egg whites and sugar must be beaten thoroughly until thick, white and increased in volume.
- Fold the dry ingredients in gently and lightly.
Nutritional Estimate Per Serving
Nutritional Disclaimer
Nutritional information is an estimate provided by an online nutrition calculator. For accurate results, it is recommended that the nutritional information be calculated based on the ingredients and brands you use.

Great and rather easy recipe for an inexperienced baker like me, my Savoiardi came out perfect! I made a double batch, and everything worked out well. Going to use these for tiramisu tomorrow.
Sarah, I’m so happy that your loved this recipe. What a spectacular tiramisu that will be!!
Hi Marcella,
If I would like to make 2 batches of Savoiardi, shall I double the ingredients?
Anita, I have never doubled the recipe. I think it’s easier to just make to separate batches. You’ve got more control over it and getting it right.
When using these for tiramisu, do you recommend baking them at 200 degrees overnight, or simply leaving them out for a few days to get stale?
Dylan, it depends on the humidity levels where you live. I live in a very humid area so I need to leave them dry out in the oven. If you live in a dry area, leaving out for a few days to dry out would be fine. I’m glad you mentioned the oven and ‘baking’ because I realized that it’s not clear. The oven is switched off. Don’t leave the oven turned on overnight. Just switch the oven off and allow it to cool down to 200 degrees then return the savoiardi to the switched off oven, close the door and leave them overnight. I’ll update my notes. Let me know if you have any other questions.s
Great recipe, easy to follow and the ladyfingers came out of the oven exactly as you would expect. The lemon rind and vanilla filled the kitchen with the most beautiful aroma.
I do love the combination of lemon and vanilla and it’s perfect for saviordi. I’m so glad you love it too and that this recipe lived up to your expectations.
I’ve never commented on a recipe before but this absolutely deserves it. They came out perfect and taste incredible! Really well written recipe that was easy to follow too and didn’t leave me shouting at my phone 😂
Shireen, I’m so glad that you didn’t have to shout at your phone…that is never good! Thank you for taking the time to write a comment. I really appreciate it.
Hi Marcella
Thank you for this recipe, just perfect. I’m gluten intolerant and made these with gluten free flour and they worked superbly, just like my nonnas. I substitute the icing sugar for plain white granulated sugar as I find it creates more crunch, my nonna always had granulated sugar on the top of her biscuits. Thank you once again, absolute treat.
Ciao Lia,
Thank you so much for your lovely comment! I’m so glad to hear that the recipe worked so well with gluten-free flour—that’s a great adaptation! And I love that you added granulated sugar on top, just like your nonna did. It’s always special when a recipe brings back memories of our nonnas. Thank you for sharing your version.
Hello Marcellina,
For crisping, do you keep the oven on at 200F overnight or just cool to 200F & keep the savoiardi overnight with the oven off? Thank you very much.
Maria, I remove the savoiardi, turn the oven off and allow it to cool to 200F. Then I return the savoiardi to the switched off but still warm oven and leave them there overnight. I’ll update the notes so make that more clear.
Can you use sugar substitute, like stevia, to make the cookies. I need to make diabetic friendly
Ciao Etta, I haven’t tested this recipe with stevia or other sugar substitutes, so I can’t say for sure how it would turn out. If you decide to try it, I’d love to hear how it goes!
PERFECTION!!!! Excited i found this recipe, If I could give it 10 stars I would!!! THANK YOU!!!
Anna, I’m super thrilled that you love this recipe!
Excellent recipe!
I’m so glad you loved this recipe, Nat!
I made them several times and this recipe is the only one I use for my tiramisy. The recipe is easy tilo inderstand, simple ingredients and great result.
Recommend it for anyone who wants true savoiardi!
Sanela, thank you for writing such a detailed comment particularly about the recipe being easy to understand which is really my aim and a great result too, of course. I’m so happy that you love this recipe and use it for your tiramisu.
I am surprised that the egg yolks are not beaten well.
No, the egg whites have captured all the air necessary for this recipe.
Omg these are fabulous! Thankyou so much for the recipe! I used my yuka app to scan the ingredients of store brought ones and they had a texturising agent that effects your kidneys , associated with cardiovascular disease and potentially carcinogenic !!! So I thought I’m going to make my own ! Yours are so much nicer than the shop ones so that’s a double bonus !
Thank you for making time to comment. I’m glad you found the recipe and loved them so much!
Hi instead of piping into fingers can I bake them like a sponge?
Maybe you could. My recipe for Pan di Spagna is very similar in proportions. If you want a sponge, follow this recipe https://www.marcellinaincucina.com/pan-di-spagna/ which gives baking times and tips.
Thank you so much – will try this