
Italian Rice Balls


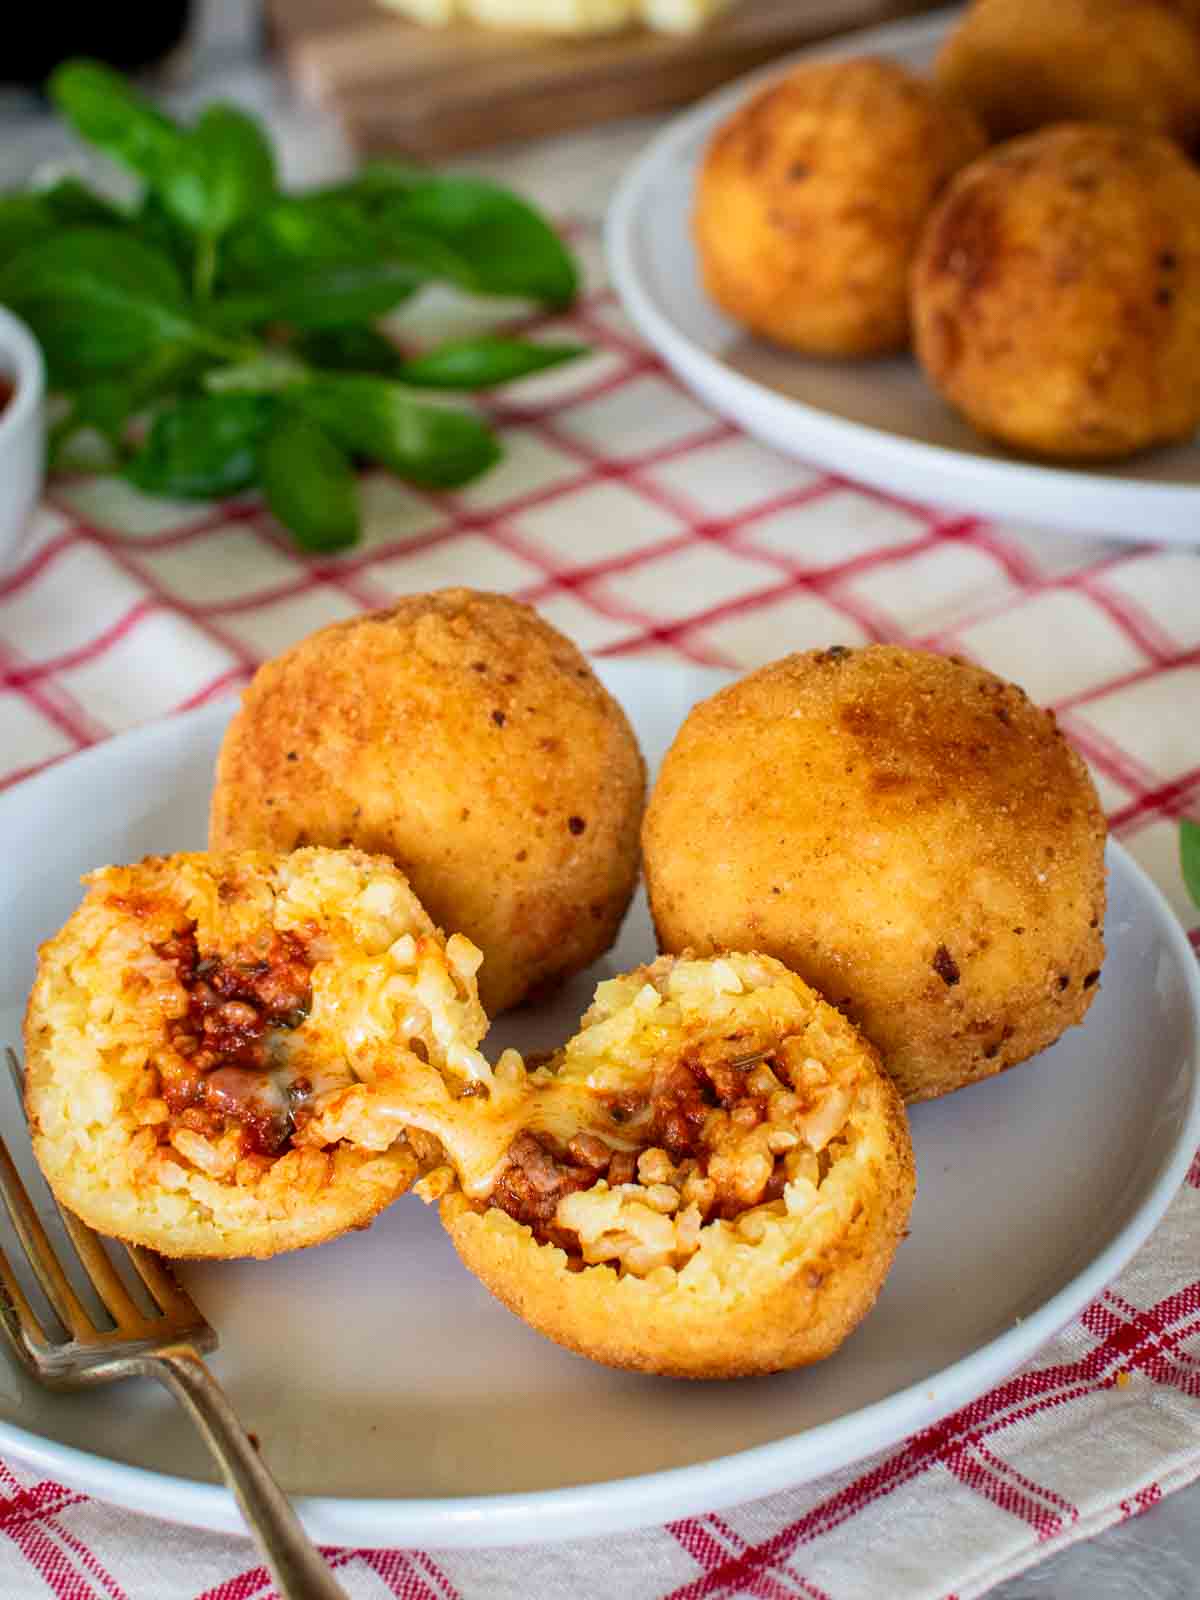
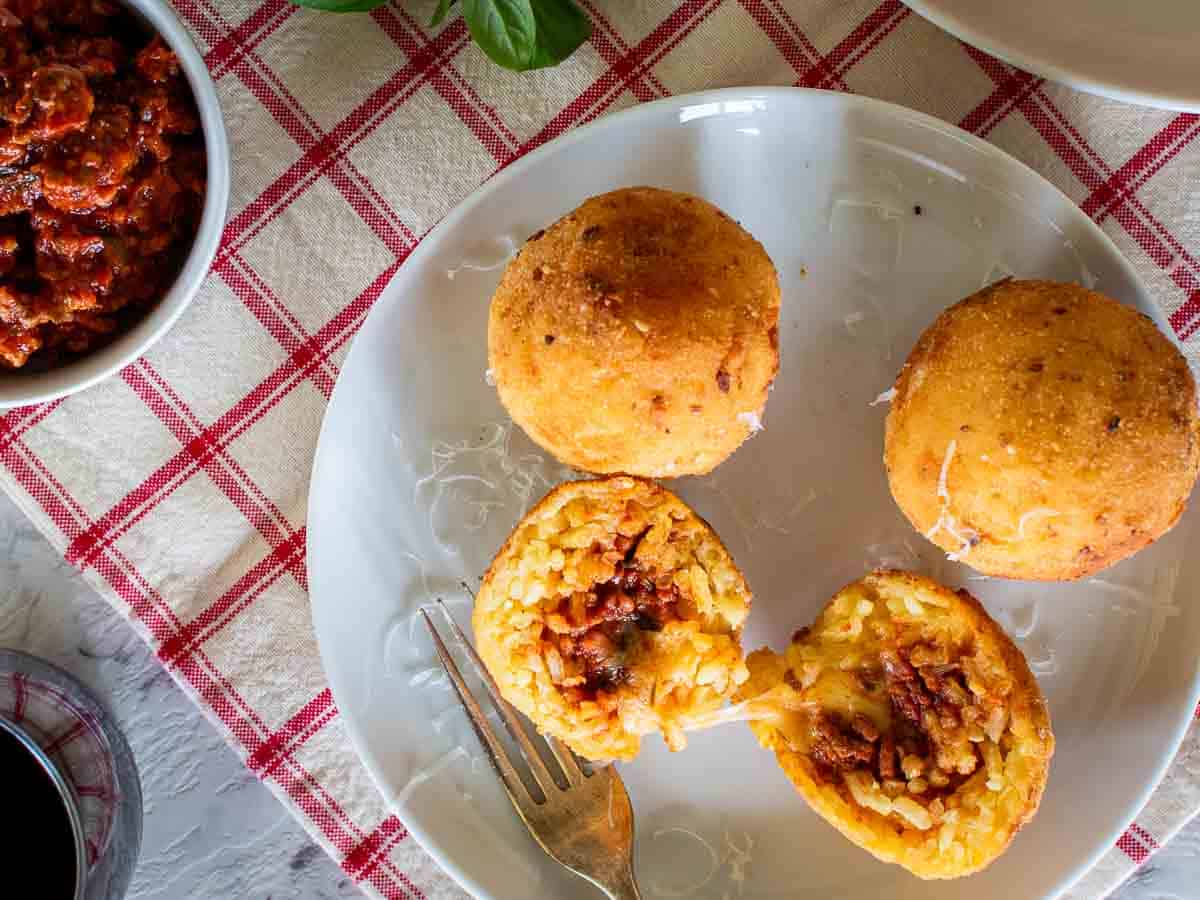
Italian Rice Balls, or Arancini Siciliani, are golden, fried rice balls filled with a rich, tasty meat sauce and gooey mozzarella cheese.
Tried them before or making them for the first time? These crispy rice balls are easier than you think! A beloved street food, they’re one of Italy’s most popular dishes for good reason.
The best arancini rice balls I have ever had were on the ferry that crosses the strait between Messina and Reggio Calabria in southern Italy. Only 1 euro from the ferry bar, my cousin insisted I try them. If you find yourself on this ferry, don’t go without – they are sensational.
These Italian Rice Balls, also known as arancini di riso, are filled with the traditional filling of ragu and mozzarella cheese and are the most typical that you’ll find in Sicily and other parts of Italy. But you don’t have to go to Italy to enjoy great traditional food. While this recipe isn’t quick, it is easily achievable, just like my recipe for homemade pesto gnocchi, saffron risotto, and Italian tiramisu.
Why you’ll love this recipe
- Flavorsome – this recipe for arancini balls is the tastiest ever! I’ve tested this recipe many times and have had many tasters who declare these “THE BEST”!
- Gooey cheesy filling – if you’re looking for gooey, melty cheese, go no further. This recipe will deliver the promise!
- Step by step – let’s not pretend that this is a quick recipe. There are several components to it. However, by following all my clear steps and tips together with some patience, you’ll make delicious fried rice balls that you’ll be proud of, which will impress your family and friends!
- Variations – Once you have mastered the original recipe, you can adapt the fillings to suit your tastes. Mushrooms, spinach, chicken, and other cheeses can all be used. I’ve even seen a recipe for Nutella arancini!
What are Italian Rice Balls?
The Italian name for these balls is Arancini Siciliani, meaning “little oranges” in Italian. Traditional Italian rice balls are filled with a meat sauce and mozzarella cheese. Once coated in breadcrumbs and fried, these golden balls actually look like oranges.
The best rice to use in this recipe
Rice used for risotto like arborio or carnaroli is perfect for this recipe. The extra starch in this rice creates creaminess that ensures the rice sticks together and the ball doesn’t fall apart.
Don’t use long-grain rice. This is better reserved for recipes like my Brown Rice Salad.
For complete ingredient quantities and full instructions, please scroll to the printable recipe card at the bottom of the page.
Ingredients
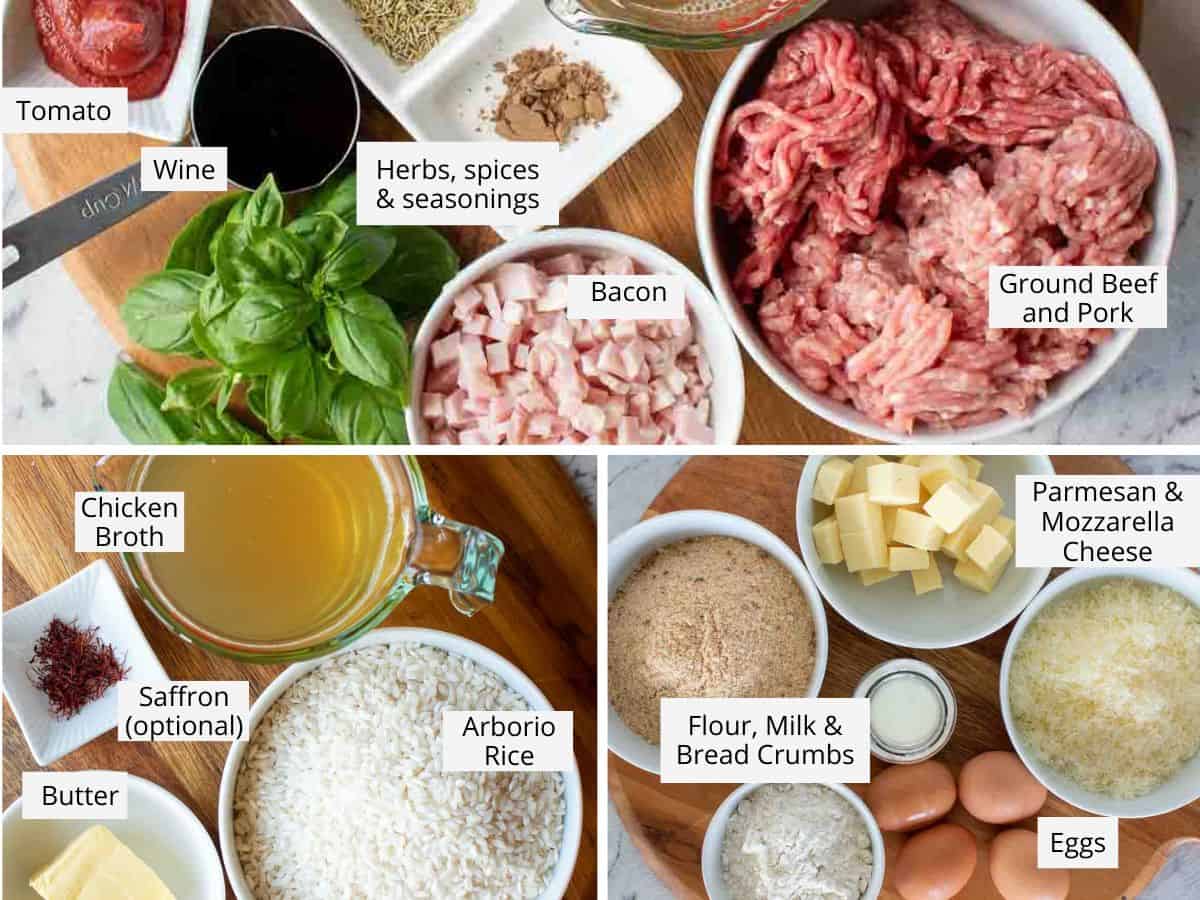
- Arborio rice – this Italian rice is available in most grocery stores. Look for it near all the other varieties of rice.
- Chicken broth – use good quality, store-bought chicken broth. Alternatively, broth can be substituted with bullion powder and water.
- Olive oil and butter – use whatever olive oil and butter you have. I prefer light-flavored olive oil, which is a good option for frying, but regular oil will be fine. You can also use another oil you like.
- Saffron threads – this ingredient is optional but gives a golden color and wonderful flavor. (see the variations for another suggestion).
- Onion and garlic – fresh is best for flavoring the meat sauce.
- Meats – ground beef, ground pork, and bacon.
- Dry red wine – this doesn’t have to be expensive wine.
- Tomato – pureed tomatoes plus concentrated tomato paste gives the intensity that’s needed for this meat sauce in this Italian rice ball recipe.
- Herbs, spices, and seasonings– I like to use fresh rosemary. However, you can use herbs such as fresh basil, dried oregano, dried rosemary, or spices like ground allspice, salt, and pepper.
- Peas – frozen peas can be added to the meat sauce. This is optional but often included in traditional arancini Siciliani.
- Cheeses – grated Parmesan cheese (or Parmigiano Reggiano) and mozzarella cheese.
Plus some basic items like flour, egg, milk or water, and bread crumbs.
How to Make Italian Rice Balls
Follow along with my easy instructions to learn how to make Italian rice balls in your own kitchen.
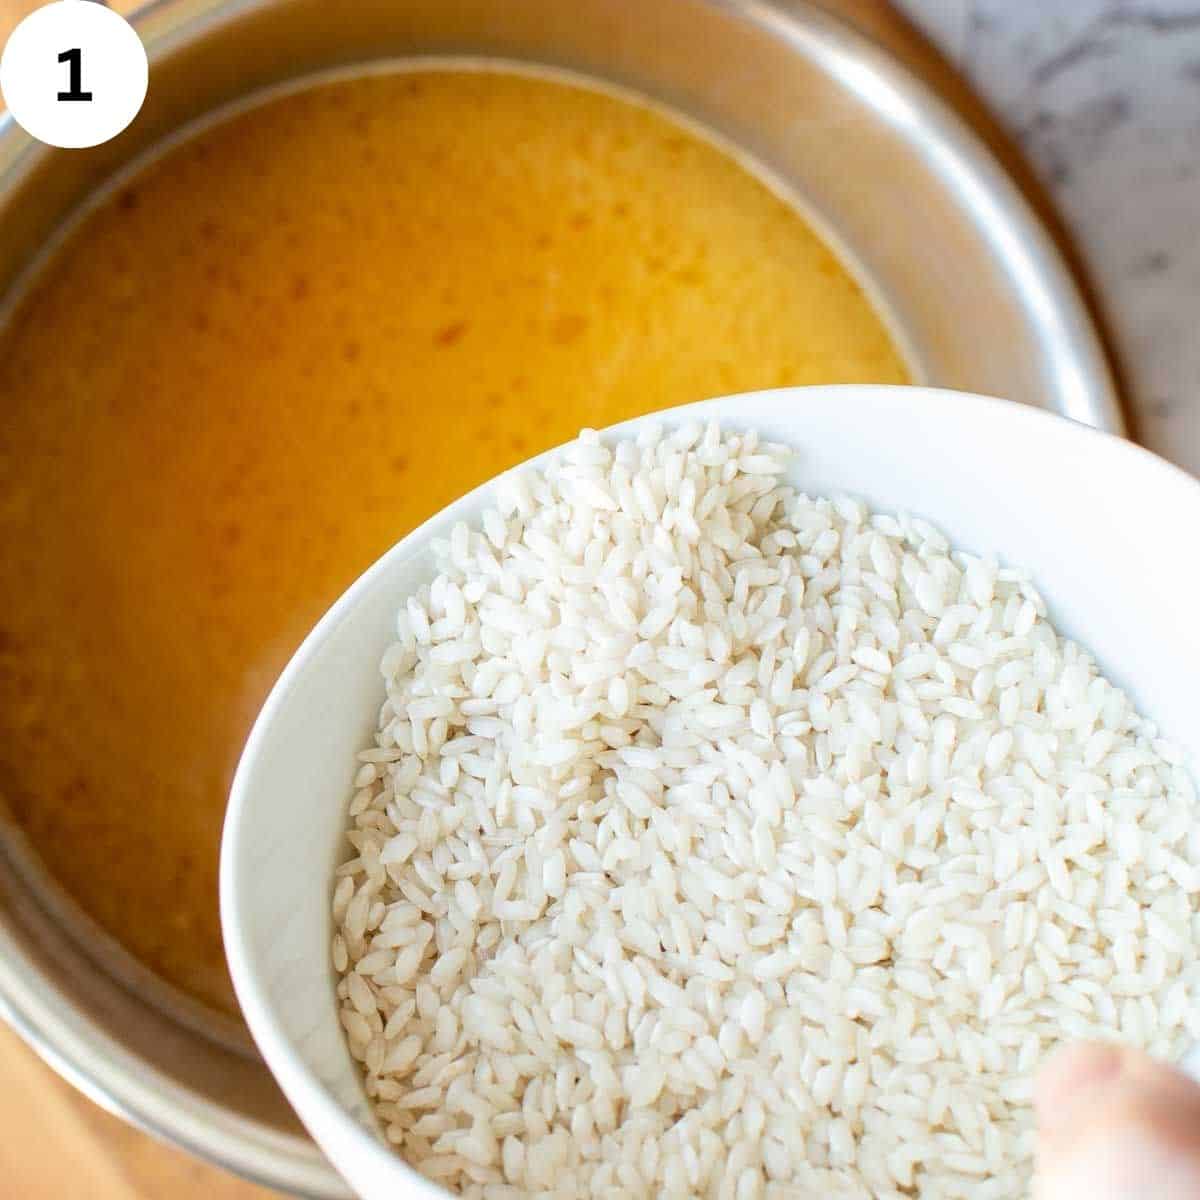
Add rice to boiling chicken broth, butter, and saffron (if using). Stir, reduce heat, and cover with a lid to cook. When tender, drain and allow to cool.
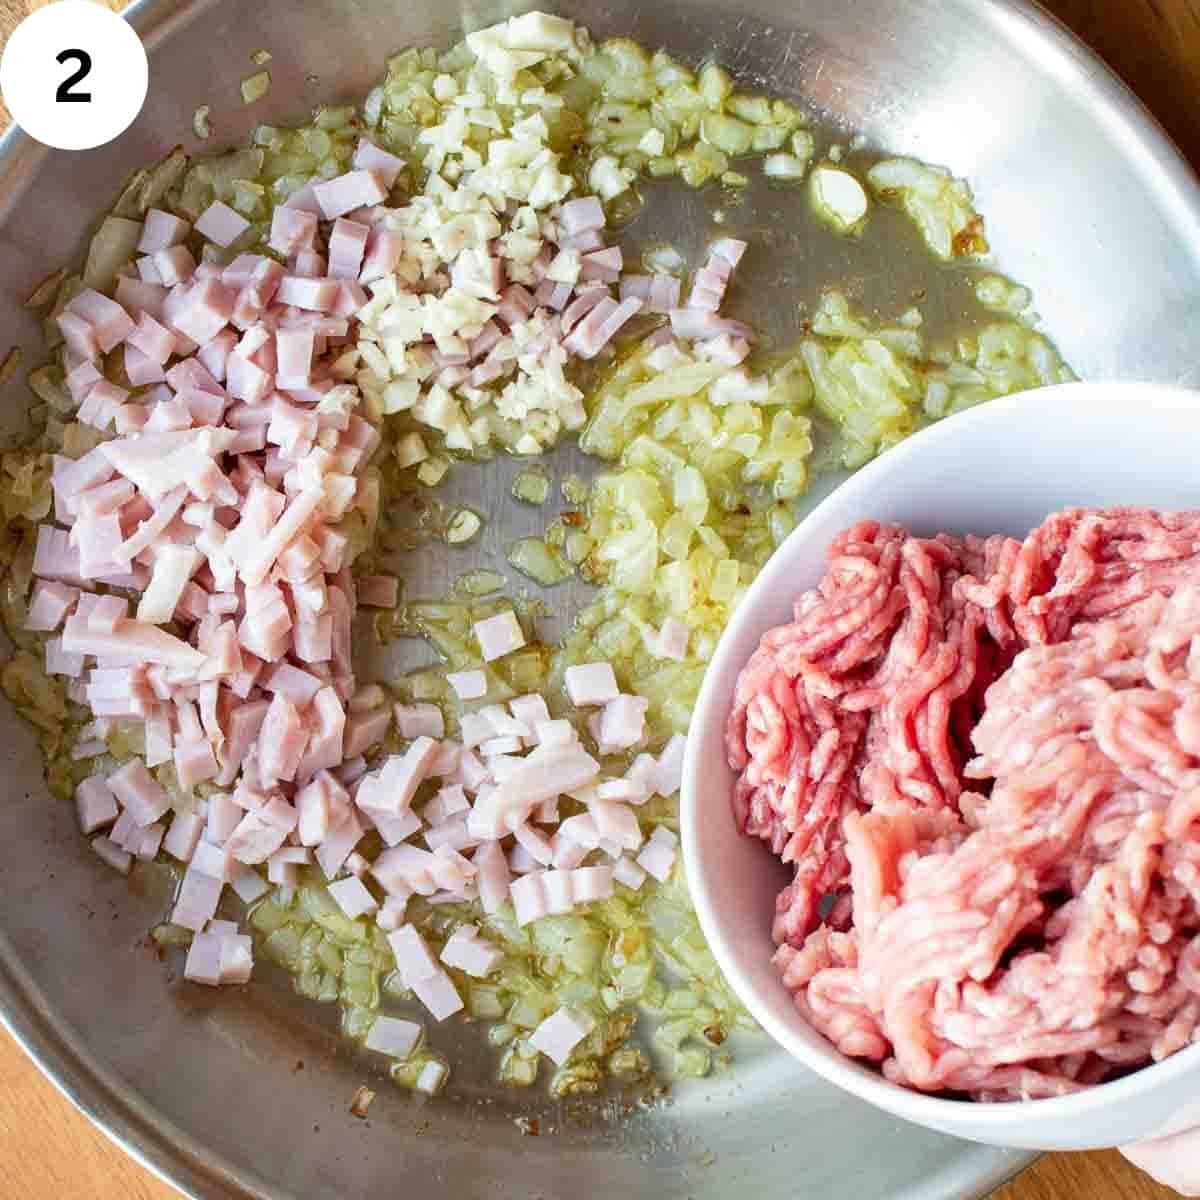
Prepare the meat sauce by sauteing the onion, garlic, and bacon, then add the ground beef and pork.
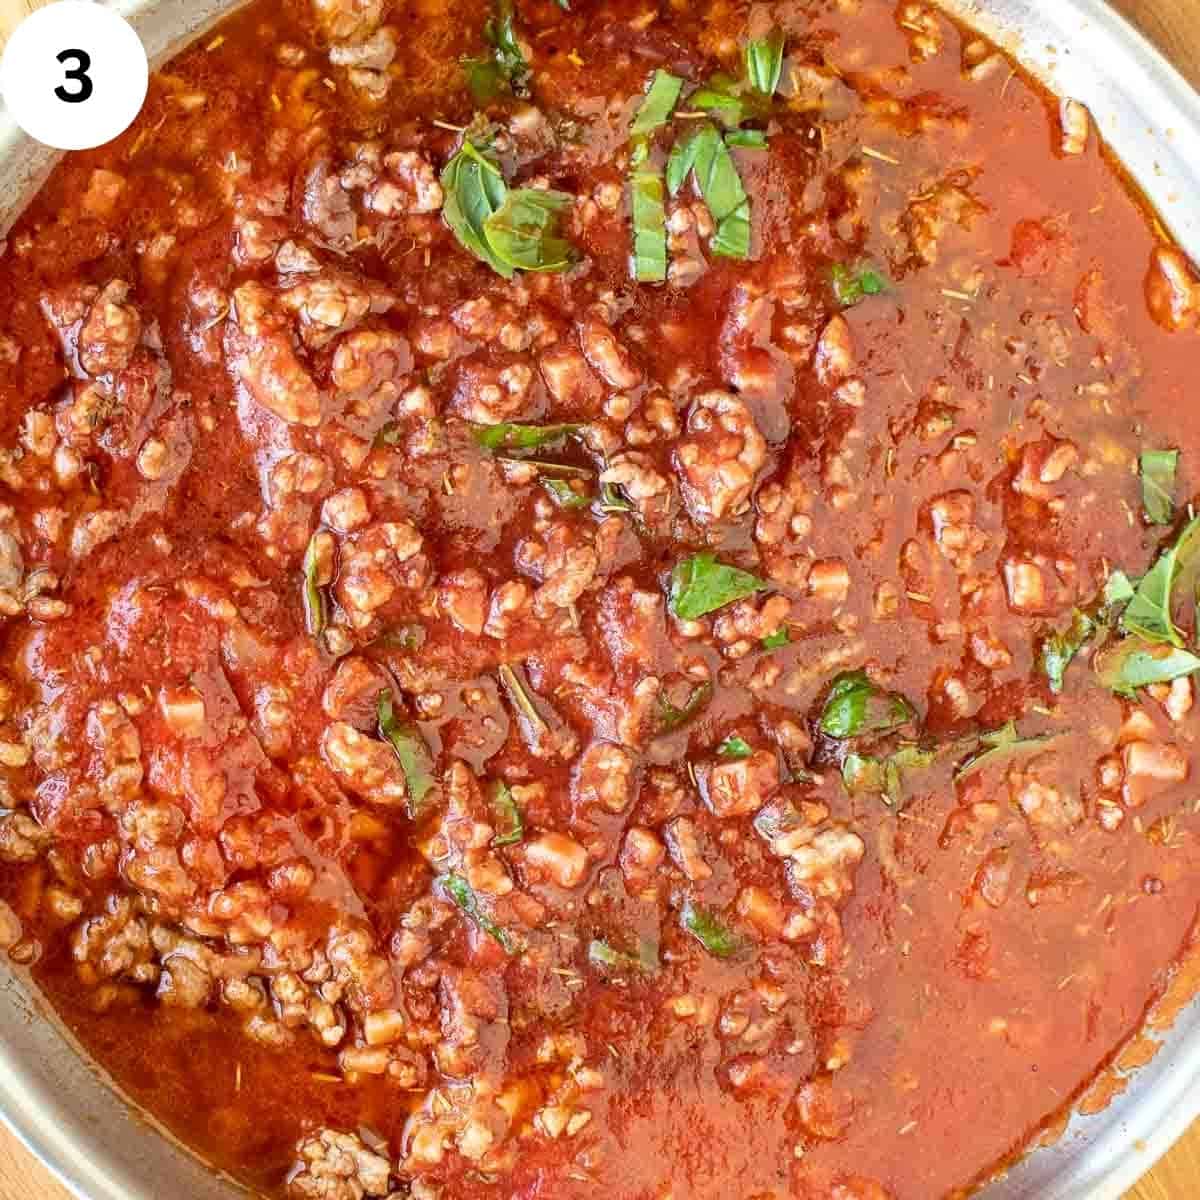
Add the remaining ingredients and simmer the sauce for 1 hour.
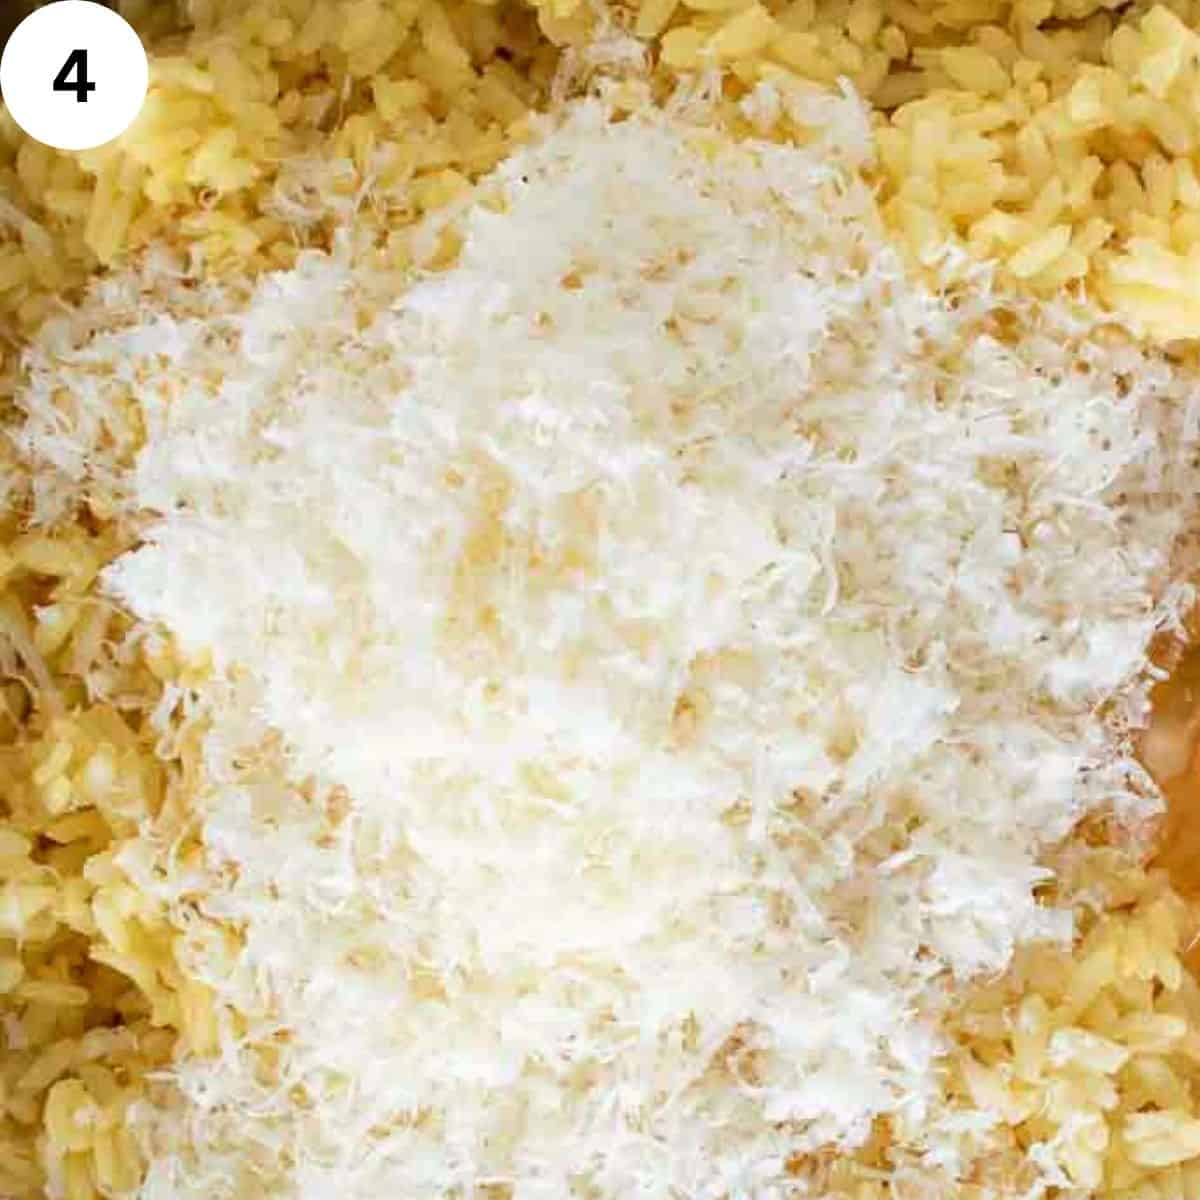
Stir the Parmesan cheese into the cooled rice.
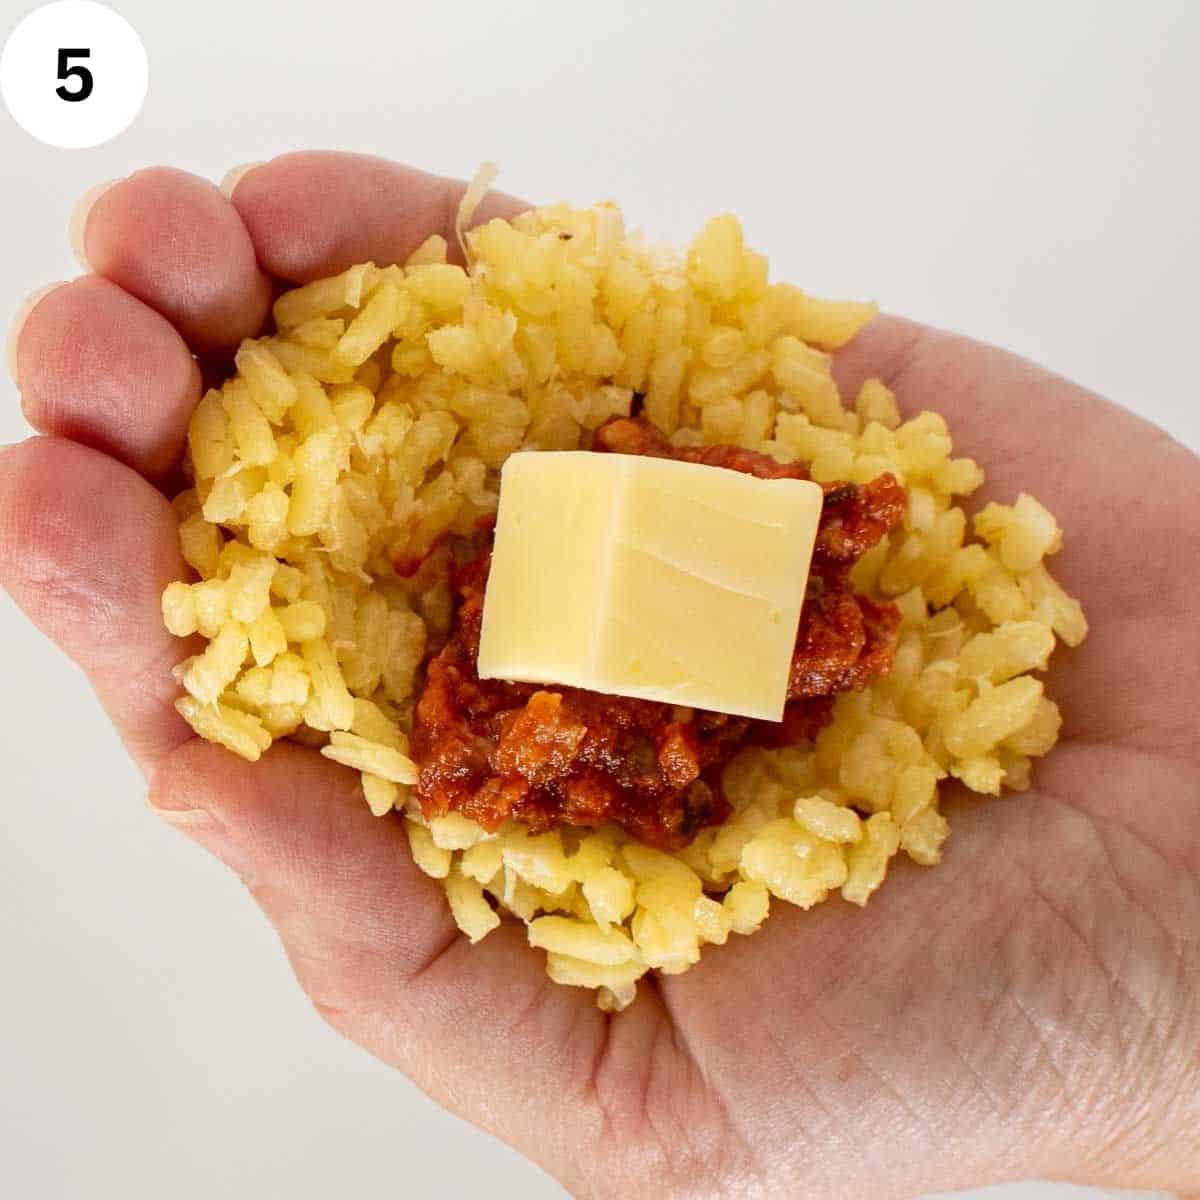
Flatten some of the rice mixture in the palm of your hand, and top with a spoonful of cooled meat sauce and a cube of mozzarella cheese.
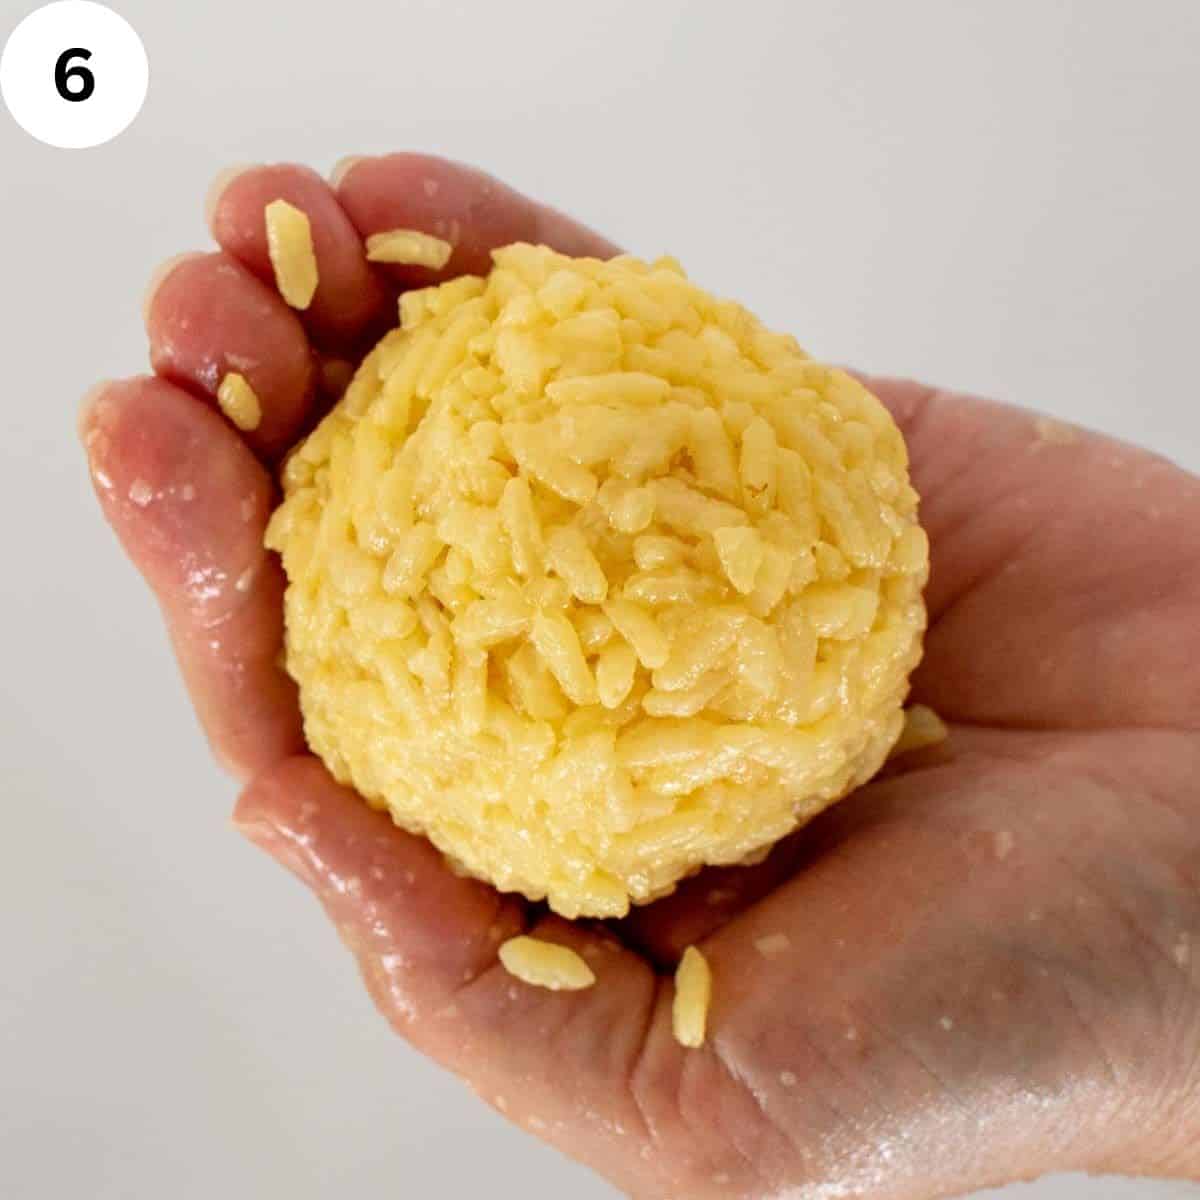
Cover with more rice and press to form a ball.
Whisk together flour, milk (or water), and egg. Dip the rice ball into the flour mixture and then into the breadcrumbs.
Fry in abundant hot oil. Remove the fried rice balls when golden brown and drain on paper towels.
Hint: Set the breadcrumb-coated balls on a baking sheet and refrigerate for 30 minutes. This will ensure that the arancini di riso don’t fall apart when frying.
Substitutions
- Saffron – use some of the meat sauce or homemade tomato sauce instead of the saffron to color and flavor the rice. Omit the saffron when cooking the rice, then add ½ cup of meat sauce to the drained rice and proceed with the recipe.
- Dry red wine – substitute dry white wine if you prefer.
Variations
- Gluten-free – use gluten-free breadcrumbs and flour to keep this recipe completely gluten-free.
- Vegetarian – substitute my San Marzano Tomato Sauce for the meat ragu to make a delicious variation.
Equipment
The wonderful thing about Italian Rice Balls is that anyone with a bit of patience can make them without special equipment. After all, this is Italian street food that the nonnas made using their very basic equipment.
However, if you want to make it a little easier, this recipe can be made using an arancini maker. This mold makes arancini quickly and easily. There are a few brands on the market, but the one I use is made in Italy and available online or in Italian import stores.
Storage
Store leftover balls in an airtight container in the refrigerator. To reheat, place a single layer on a baking sheet and heat in a preheated 350ºF/175ºC oven for 25 to 20 minutes.
This recipe is ideal to make in advance. Prepare the meat sauce and store it in the fridge for up to 3 days. Complete the recipe, including coating rice balls in bread crumbs, and then refrigerate for up to 3 days before frying.
These arancini di riso freeze well. Place them in one layer in an airtight container and freeze for up to one month. Defrost completely in the refrigerator overnight before frying as per the recipe.
Top Tips
- To prepare this recipe more easily, make the rice and ragù the day before.
- The ragù will keep well frozen for up to one month in advance. To freeze, portion the sauce into separate sealed containers because not all meat sauce is used for this recipe. Serve extra sauce with arancini di riso. Alternatively, it’s delicious stirred through al dente cavatelli or tagliatelle, or it will freeze for up to 3 months the next time you make this recipe.
- Be sure to taste the rice and the ragù for seasoning and adjust the salt.
- Use wet hands to mold the arancini Siciliani. This will help the rice not stick to your hands and simplify the job.
- Use abundant oil for frying. You don’t need a deep fryer to make Sicilian arancini. A large saucepan filled with oil is sufficient.
- The oil needs to be hot enough to fry and seal the exterior. If it’s too cool, the oil will be absorbed. To obtain the correct temperature, heat the oil over medium heat for 5 to 10 minutes—test by dropping a cube of bread in. The oil is ready if it sizzles and turns golden in 15 seconds.
FAQ
Both risotto and arancini are famous Italian rice dishes. Risotto usually begins with adding rice to sauteed onion, then slowly adding hot broth until the rice is cooked, just like in my dad’s Saffron risotto.
Instead, the rice for this recipe is prepared in the opposite way. Rice is added to carefully measured boiling water or broth and then cooked gently until the liquid is absorbed and the rice is cooked.
It’s thought the arancini or Italian rice balls are prepared using risotto. This isn’t correct. The traditional and authentic way is to use the absorption method to cook the rice.
Rice balls in Rome are called supplì, but these are not to be confused with the Sicilian arancini. Supplì are elongated croquettes made using rice that has been cooked in meat sauce and filled with mozzarella before being breaded and fried.
The full name is “supplì al telefono” because the stringy mozzarella resembles telephone wires joining the two halves of a split croquette. Serve supplì as an appetizer.
Rice balls in Italian are arancini. Pronounce the word in this way – ar-an-chee-nee.
Serving Suggestions

Italian Rice Balls are traditionally served as a meal, not an appetizer. Some people like to eat these as they are in their hands. Alternatively, serve these Sicilian arancini with extra meat sauce or marinara sauce for dipping and scooping and a sprinkle of Parmesan cheese.
Complete this Italian meal with a quick and easy Tiramisu in individual cups or a Sweet Ricotta dip and fresh seasonal fruit.
More recipes you’ll love
Homemade cavatelli pasta
Garganelli pasta
Busiate pasta
Made this recipe?
Please let me know if you liked it by leaving a ★★★★★ star rating and a review below. And remember to subscribe to my newsletter – it’s free!

Italian Rice Balls Recipe
Equipment
- arancini maker optional
Ingredients
For the rice
- 4 cups (800 grams) arborio rice See Note 1
- 6 cups chicken broth See Note 2
- ⅓ cup (80 grams) salted butter
- large pinch saffron See Note 3
- 1 teaspoon salt or to taste
- 1 cup finely grated Parmesan cheese
For the meat sauce filling
- 2 tablespoons olive oil
- ½ onion finely chopped
- 1 small stick celery finely diced
- ½ carrot finely diced
- ¾ cup (100 grams) chopped pancetta or bacon
- 2 garlic cloves finely chopped
- 8 ounces (225 grams) ground beef
- 8 ounces (225 grams) ground pork
- ¼ cup red wine See Note 4
- 2 cups tomato puree (passata)
- 1 tablespoon tomato paste
- ½ cup chicken broth See Note 2
- 1 stalks fresh rosemary (or 1 teaspoon dried rosemary) See Note 5
- freshly ground pepper
- salt to taste
- ½ cup frozen peas optional
To assemble and fry
- 1 cup all purpose flour
- 1 cup milk or water
- 1 egg
- 2 cups dried breadcrumbs
- 8 ounces (225 grams) mozzarella cheese See Note 6
- Oil for frying light flavoured olive oil or your preferred oil
Instructions
To prepare the rice
- If using saffron strands, grind with salt.
- In a large saucepan, bring to a boil the chicken broth, butter, and saffron/salt mixture (or just salt).
- When boiling, add the rice, stir and bring back to the boil.
- Once boiling, reduce heat to the lowest cover with a tight fitting lid and cook for 15 minutes. Don’t be tempted to lift the lid.
- After the cooking time turn the heat off. Don’t lift the lid! Let the rice sit for a further 10 minutes. After this time you should have perfectly cooked moist rice that clings together well. I cook on my largest gas ring then set the flame on the lowest and also use a flame diffuser.
- Turn the rice into a large, flat baking dish and mix through grated parmesan cheese. Cover with plastic wrap to retain the moisture and allow to cool. Taste and add salt if necessary to your taste. For the rice to stick together to form the balls, it shouldn't be fridge cold.
To prepare meat sauce
- Heat the oil and add the finely chopped onion, carrot and celery. Saute for a few minute until softened.
- Once the vegetables are softened, add the pancetta or bacon, chopped garlic followed by the ground meats. Stir and fry to brown, breaking up the meat well.
- Add the wine and allow it to come to a boil.
- Then add the remaining ingredients except the peas. Bring to a boil, then turn the heat down and simmer slowly for 1 hour without the lid. The sauce should be thickened and reduced to about 4 cups.
- Don’t forget to taste as you go and adjust the seasoning. If adding frozen peas, stir into the meat sauce 10 minutes before the sauce is done.
- This recipe needs approximately 2 cups of meat sauce.
- Not all the meat sauce will be used to fill the Italian Rice Balls. The remaining can be served alongside or freeze the remaining meat sauce for later.
To assemble and fry
- The following steps are for forming Italian Rice Balls by hand. An arancini maker or mold can be used. The best ones are the originals that are made in Italy. These come in various sizes and shapes. Depending on the mold you choose, this recipe will make more or less balls.
- Have the cooled rice, cooled meat sauce, and chopped mozzarella cheese ready for the assembly.
- If the rice has been prepared in advance and chilled in the fridge, warm in the microwave oven before forming the balls or it will be crumbly and not stick together well. Stir the rice to evenly distribute the heat, and add a little more water if it still seems dry.
- If the rice seems very crumbly (even if just cooked), with a clean hand massage the cooked rice to develop the starch. Don't break the grains of rice. This will make it more sticky.
- Wet your hands – this will make shaping the balls easier. Take about a tablespoon of rice and flatten into your cupped hand. Add a large teaspoonful of meat and cube of cheese. The cheese will melt better if the cube is cut in two or four pieces before stuffing into the Italian rice ball.
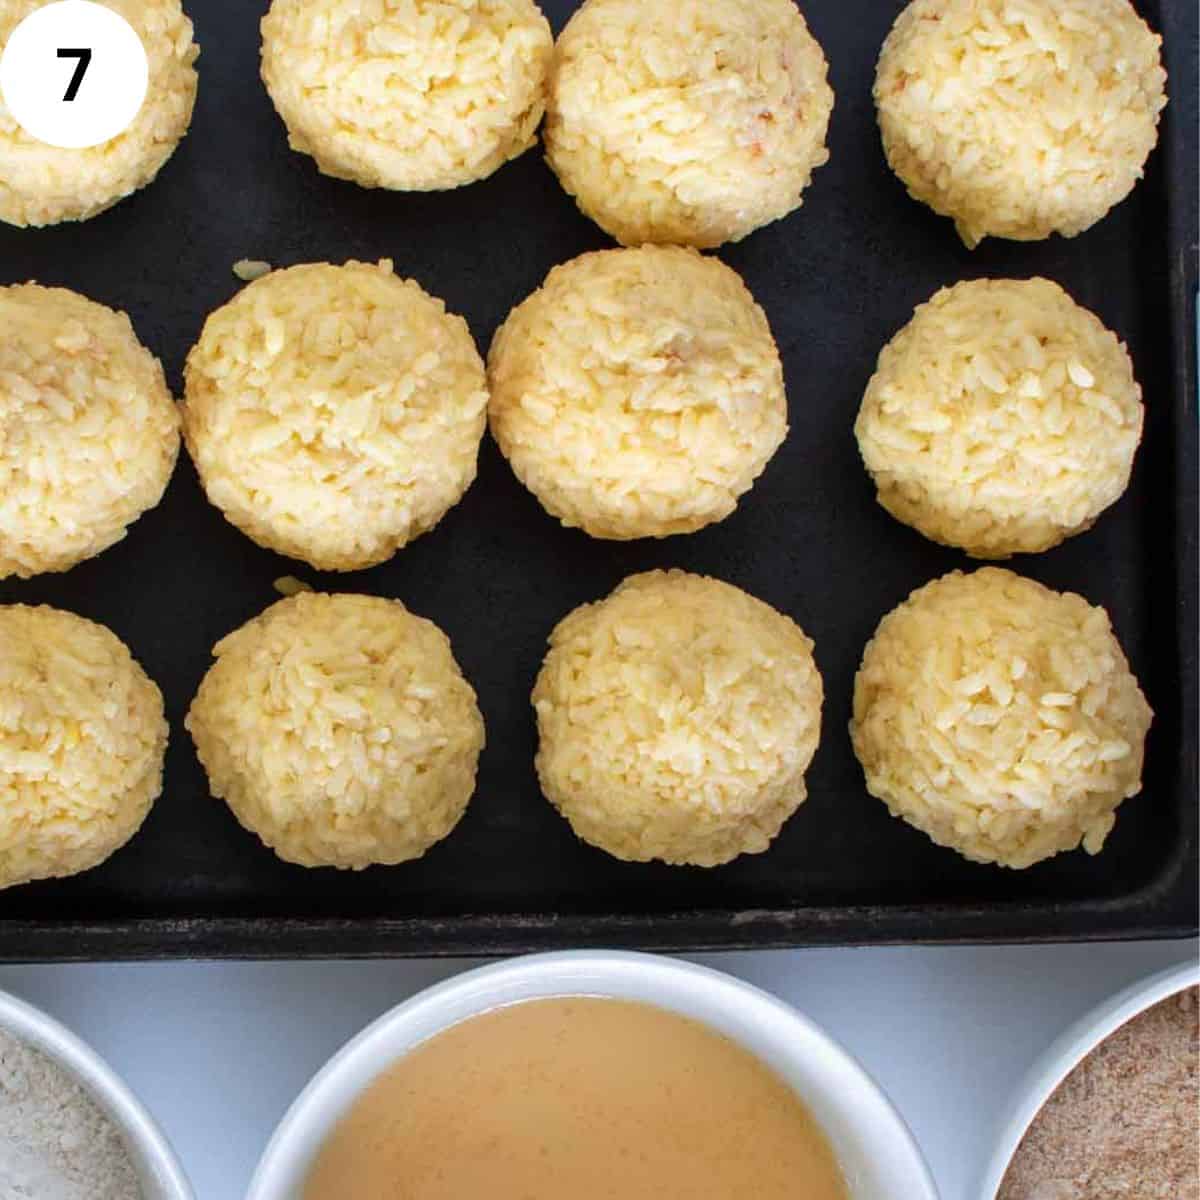
- Add a little more rice on top while moulding the edges of rice around the filling. Press together firmly with your other hand cupped over the top and form a ball. Make sure no filling shows. Add more rice if necessary. Refrigerate while you prepare the batter.
- In a large bowl, whisk together the flour, water, or milk and egg. It's correct that the batter is thin. Place the bread crumbs on a large plate. See note 7 for more information.
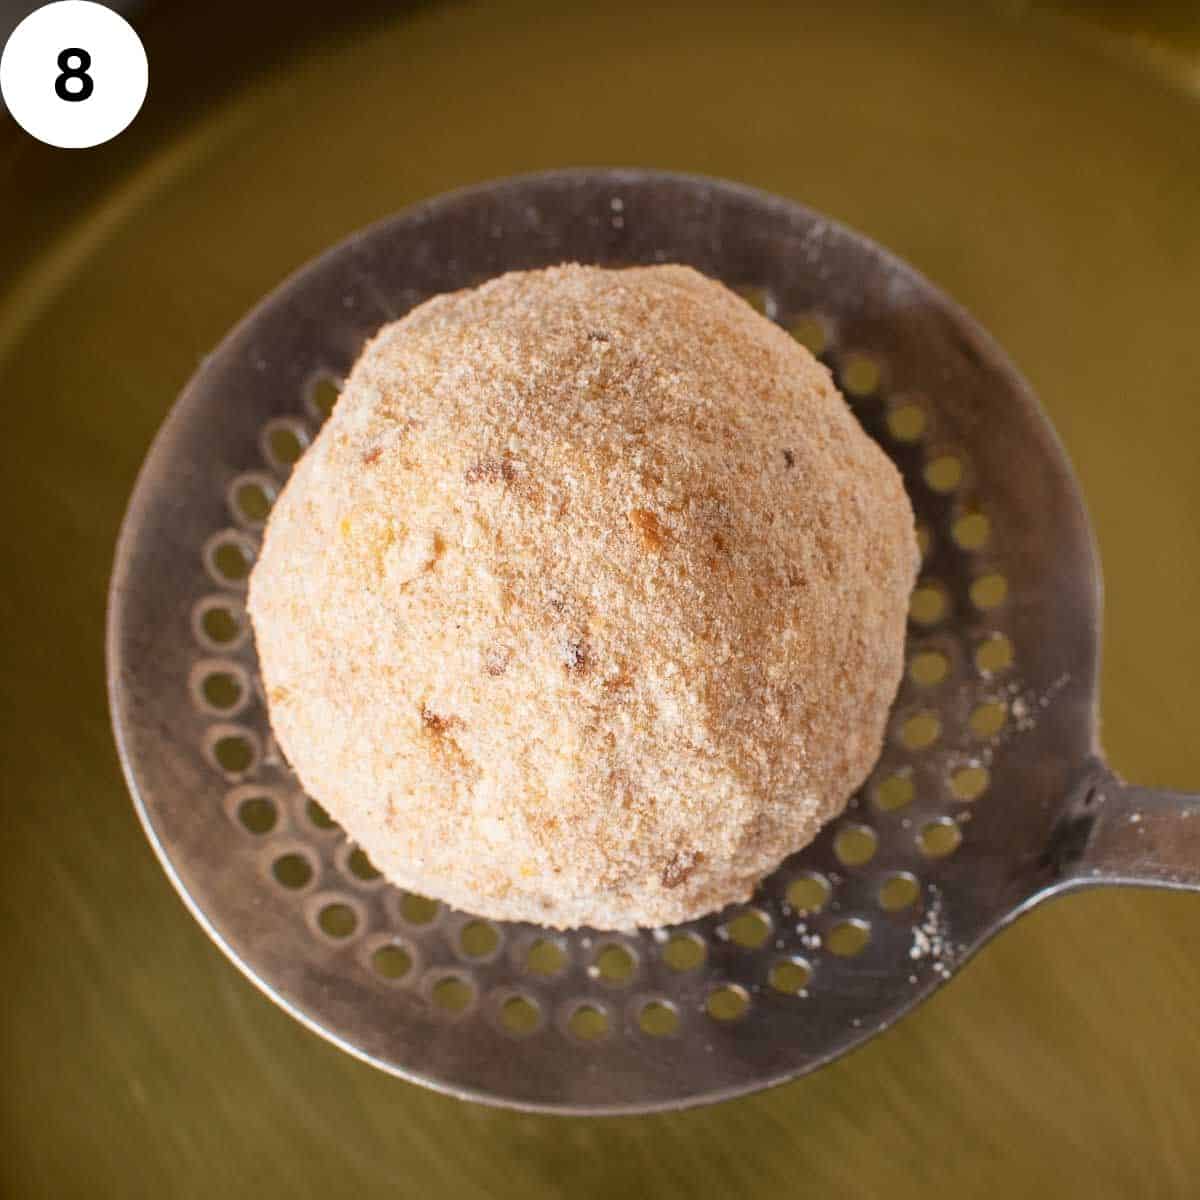
- Dip each rice ball into the batter. Use your fingers to ensure batter completely coats each ball. Once all the rice balls are dipped in the batter, roll in breadcrumbs.
- Refrigerate your rice balls for 30 minutes.
- Pour light flavored, olive oil into a saucepan or deep fryer (the oil should be at least 2 inches/5cm deep). Heat the oil over medium heat for about 5 minutes to obtain the correct temperature. Drop a cube of bread in and it should sizzle and turn golden in about 15 seconds.
- When the oil is at the correct temperature, carefully lower 3 or 4 rice balls (whatever fits comfortably in the saucepan) into the hot oil. I use a slotted spoon to do this.
- Fry until golden brown and heated through. Use a fork to gently turn the rice balls if they are browning more on one side than the other.
- Use a slotted spoon to remove the rice balls from the hot oil. Drain on absorbent paper. Repeat with the remaining rice balls, adjusting the temperature as necessary. Serve hot.
Notes
- Carnaroli rice or other short-grain rice that’s good for risotto or rice puddings will also work in this recipe.
- Use homemade or good quality store-bought chicken broth or prepare a broth with hot water and bullion or stock cubes.
- Instead of saffron, substitute 1 cup of tomato puree for 1 cup of chicken broth or stock. This will flavor the rice and give it a reddish color.
- Dry white wine can be used instead of red wine. Or substitute with extra chicken stock/broth.
- Other herbs or spices like dried oregano, fresh basil, or a sprinkling of allspice can be used.
- Chop the mozzarella cheese into small pieces. Smaller pieces will melt better within the rice ball.
- If you are a return visitor to this recipe, you will note that this method is slightly different for coating the rice balls. You can coat the balls in flour, followed by beaten egg and milk, then dip in bread crumbs.
- Read through the whole recipe and plan. The meat sauce can be made three days in advance. The rice will need time to cook and cool to lukewarm before assembling the Italian Rice Balls.
- Taste the meat sauce and rice and adjust the seasonings to suit your tastes.
- Wet your hands before shaping the balls. This will help the rice not stick to your hands.
- The number of balls this recipe makes will depend on how big you form them.
- Heat the oil to the correct temperature.
- Take care when frying. Don’t leave the hot oil unattended.
Nutritional Estimate Per Serving
Nutritional Disclaimer
Nutritional information is an estimate provided by an online nutrition calculator. For accurate results, it is recommended that the nutritional information be calculated based on the ingredients and brands you use.
This updated recipe was first published on March 15, 2010.


Made Italian Rice Balls for a surprise birthday dinner, worth all the work to make them.
So happy they turned out perfectly & guests enjoyed them. Will definitely make again & freeze them for another time. Thank you Marcellina for your beautiful recipes.
Lynette, I’m so happy that you love this recipe! Yes, it’s wonderful to have these in the freezer ready for a treat any time. Thank you for taking the time to let me know your thoughts.
Hi. I want to make the rice balls but can I assemble them then freeze them before I fry them? I need to make them a week before. They look amazingly delish! Thank you!
Yes, I have done that before. The rice balls must be completely thawed before frying otherwise they have a tendency to split. They are really super delicious and so popular! I hope you loved them too.
These were absolutely amazing! I made the sauce and rice 1 day before assembling and I did have to add a little water to the rice to stop it from crumbling. In the end they turned out perfectly.
I’m glad you loved these, Lucy!
It says peas optional. I want to use them but the recipe instructions make no mention of when to use them and how to cook them for this.
Wendy, if you’re adding frozen peas, stir them into the meat sauce 5 minutes before the sauce is done.
I add my frozen peas in meat sauce. they cooked nicely together
I’m so glad you tried that, Mona! The peas add a nice touch, don’t they? Thanks for your comment!
What did I do wrong, my rice isn’t sticking and shaping into balls!! 😭😭
Did you use the correct rice and cook it according to the instructions? Are you pressing firmly to stick the balls together? Cup your two hands one over the other press firmly. Also did you make the rice in advance? If it’s cold it will be more crumbly. In this case, warm the rice in the microwave and add a little water to moisten the rice.
I realised I missed a completely crucial step… Adding the cheese to the rice 🤦♀️
No problem, Katherine. The rice balls will still be delicious.
A way to make rice a more tacky os to soak the rice in water for 10-15 before cooking. I’m not sure if this would throw off the recipe or not. These look good, I’ll have to give these a go
That’s not traditional but it may be an option. The rice is tacky enough cooked as specified in the recipe. If the rice is made in advance and refrigerated it will dry out and become difficult to hold together. I don’t know if soaking the rice before cooking would change this but thank you for your suggestion.
Are you using fresh mozzerella or the pizza style mozzerella?
Lucy, either would be fine. I usually use dry mozzarella or pizza style.
Excellent recipe!!! The mixing of egg flour and water to coat the riceballs before frying is genius . What a time saver.
Thank you! I’m glad you like the coating and the recipe, Liz. The coating quite traditional in some places.
Hi,
I made your recipe. I have to say, I’ve never made anything so involved and time-consuming. The only change I made was adding a spoonful of black pepper to the rice/parmesan cheese mixture and omitting the alcohol (due to religious beliefs). I was exhausted by the time I finished but once I took a bite out of those golden rice balls, I thought the unique and delicious flavor was well worth the effort. You Italians know what you’re doing. Next time, I’ll cook the arancinis over the course of 2-3 days. Thank you for sharing your recipe!
Hi Hafiza! You certainly would have been exhausted because as you said, this is a recipe that is best prepared over the course of a few days (as the nonna’s would have done in the past). The great thing is that the rice and the filling a best prepared in advance. I’m so happy that you loved my family recipe and persevered. Thank you for you thorough feedback.
You’re most welcome. My family is already asking for more arancinis. lol. You’ve given us a gift.
How wonderful that you family loves them so much! (my family does too!)
Risotto was easy to prepare. The meat sauce a little time consuming but very tasty. The only difficulty I had was coating the breadcrumbs. The paste was a little sticky and tended to leave little lumps. A minor inconvenience for an unbelievable treat. Delicious hot, and every bit as good re-heated. I wish I could have given the Arancini 6 stars!!
Thanks for your honest and great feedback, Larry. I’m not sure why the paste left lumps. Maybe add the water slowly to the flour while whisking. I’ll add that into the recipe. I’m thrilled you love these. These are a family fave in Marcellina’s kitchen!
ciao marcellina stai bene I make the rice balls I just put mozzarella in side and wen I fry them the mozzarella cheese doesn’t melt I don’t know why do you know wat I am doing wrong please let me know what you think
Ciao Ada! Tutto bene. Spero anche te. There could be a couple of problems. One could be that the oil is too hot and the outside is browning before the heat gets all the way inside. Also I find sometimes one solid cube of cheese may not completely melt. So I suggest chopping the mozzarella cheese into smaller pieces. Plus check that the oil isn’t too hot. Give the heat time to get to the center of the balls. I hope that helps. I made these two weekends ago and cut the mozzarella into two or three pieces. It melt very well this way.
Hi thank you for the recipe,they turned out fantastic, I filled mine with cheese and I paired them with your Braciole recipe and together it was amazing 🙂
Yum! Glad, that’s a delicious pairing! I’m so glad you loved both recipes!
What is the brand or link for the Italian arancini maker that you like to use that you mentioned in your article? Can’t wait to try your recipe. Thank you!
Dorine, I like the original brand Arancinotto. It is made in Italy but available on Amazon worldwide. There are other brands that look similar but I can’t vouch for those. Reach out if you have any other questions… you’ll love these!!
I worked on this over the course of three days so it takes some work but it’s totally worth it. I made the arrancini for a round the world evening. It was a hit. They were delicious. The ragu was a really big hit. I served some along side so guests could use more. Everyone just loved them. Made the rice and ragu 2 days ahead which was a great tip because it made them easier to work with for assembly. I made the balls the next day, refrigerated them overnight and fried them the next morning. They sealed nicely and the interior was warm and the cheese melted. They sat in the oven on warm for an hour and a half or so and that was just fine. Delicious!
Yes, these are definitely easier when you prepare the components in advance. I’m happy that those tips helped you! Each time you make them you’ll find it easier and easier. Thanks for the feedback.