
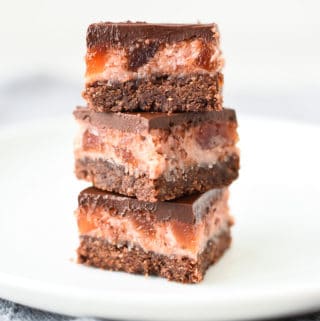
Cherry Ripe Bars

Cherry Ripe Bars are a combination of one of the most classic flavors.
This easy Cherry Ripe Bars recipe is within everyone’s capabilities and you’ll loved the impressive and delicious results!

Why you’ll love this recipe
In Australia you’ll find an amazing chocolate bar called Cherry Ripe made by Cadbury. It was first produced in 1924 and is now the oldest chocolate bar sold in Australia. These candy bars are a wonderful combination of coconut and cherries coated in dark chocolate and have proved to be one of the most popular chocolate bars in the country.
Based on the delicious chocolate bar, these Cherry Ripe Bars are one of my favorites. The base is crisp with a chewy, sweet filling but it is the chocolate topping that gilds the lily! These three layers combine into one yummy, sweet mouthful!
For complete ingredient quantities and full instructions, please scroll to the printable recipe card at the bottom of the page.
Ingredients

The base is so simple because it’s really just a crumb crust. You’ll need:
- Chocolate Flavored Cookies – I like cocoa cookies but use your favorite cookie even plain sweet cookies will be fine – something like graham crackers or shortbread would also work.
- Butter – Salted is fine in this case because it offsets a bit of the sweetness.
- Sugar – Use white granulated sugar to avoid grittiness in the base.
- Unsweetened Cocoa – For a super chocolate flavor.
- Self Rising Flour – This flour already has baking powder in it. If you can’t find it, use 1 cup of all purpose flour plus 2 teaspoons of baking powder.
Filling

- Unsweetened Desiccated Coconut – Be sure not to use the sweetened variety; it’s way too sweet!
- Condensed Milk – Full fat, not skim please.
- Glace or Candied Cherries – read more about this ingredient below.
Obviously this recipe is called a Cherry Ripe Bars that means there must be chocolate and there must be cherries. I know that glace or candied cherries get a bad rap at times. However this combination of sweetened condensed milk, coconut and glace or candied cherries together with chocolate is so good.
Be sure to find good glace or candied cherries. One thing I have noticed lately is that glace cherries are no longer as bright red or as sweet as they once were which is probably a good thing. Because of this change I added a little pink food coloring to the filling.
If you can’t find glace or candied cherries there is no substitute that I know of. Why not try my Raspberry Streusel bars instead.
Instructions

When a bar has three different layers you would think it is complicated and difficult, but not so with these Cherry Ripe Bars. Concentrate on preparing one layer at a time because each layer is quite simple.
Make the base
- You will firstly need to crush chocolate flavored cookies to prepare the base. Any cocoa cookie would be fine maybe even chocolate covered cookies.
- Sift the flour and cocoa. Sometimes I also sift the sugar if I think it is a bit lumpy.
- Mix together the crushed cookies with flour and sugar.
- Add the melted butter and mix well.
- Bake in a lined pan.
Prepare the filling
- Mix together condensed milk, desiccated coconut and cherries.
- Add a little red or pink food coloring if you want more color.
- Spread filling over cooked base.
- Return to oven to finish baking.
Hint: It’s easier to spread the filling if you place spoonfuls of the filling all over the base before trying to spread. This way you can simply join up each spoonful. I use this technique quite often to make spreading sticky fillings or toppings.
Topping and baking
- Place chocolate and butter in a microwave safe bowl.
- Microwave for 20 seconds on high, stir and repeat. Microwave the chocolate in 3 (20-second) intervals, stirring between each.
- Allow to stand for a few minutes. Stir again.
- If the chocolate has not totally melted. Try another 10 seconds in the microwave. Be careful not to overheat or you will burn the chocolate.
- Spread over slightly warm bar – the warmth of the filling will help you spread the chocolate topping.
- Cut into squares.
Tips for Success

In the past I have always had trouble cutting chocolate topped desserts like these Cherry Ripe Bars. The chocolate always cracks, the filling gets squished and the bars look like they have been hacked with a chainsaw. Do you have that problem? Well, here’s my tips for near perfect choc-topped bars.
- To begin, line the base of the pan with non stick paper. You can’t cut neat slices if you can’t get it out of the pan easily.
- Allow the chocolate topping to set but not harden completely. I do this by leaving it at room temperature overnight. If your room temperature is chilly, overnight may be too long. Conversely if your room temperature is warm, you may need to chill the uncut bar in the refrigerator slightly. The important part is that the chocolate shouldn’t be hard – that’s when it will crack and the filling will get squished.
- Use a large, sharp knife to cut cleanly and firmly through the bar.
- Wipe the blade of the knife clean before you make the next cut.
If you can keep these Cherry Ripe Bars hidden at the back of the refrigerator it will keep well for two weeks. Let me know if you managed to keep them hidden from the rest of the family!
Made this recipe?
Please let me know if you liked it by leaving a ★★★★★ star rating and a review below. And remember to subscribe to my newsletter – it’s free!
Cherry Ripe Bars Recipe
Ingredients
- 1 cup (115 grams) self raising flour see notes
- 1 tablespoon cocoa
- 1/3 cup (67 grams) superfine (castor) white sugar
- 1/2 cup (1 stick/113 grams) melted butter
- 1 cup crushed chocolate flavored cookies see notes
Filling:
- 1 1/2 cup dessiccated coconut unsweetened
- 1 cup (306 grams) sweetened condensed milk
- 1 cup chopped glace cherries see notes
- few drops of pink food colour optional
Topping:
- 1 cup chopped dark chocolate
- 1 tablespoon butter see notes
Instructions
for the Base
- Preheat 350ºF/180ºC. Line a 8in x 12in (20cm x 30cm) baking pan with non stick paper.
- Crush the chocolate cookies or grind in the food processor until fine crumbs. Combine with sifted flour and cocoa and remaining ingredients for base and press into prepared pan. Bake for 20 minutes.
For the Filling:
- In a large bowl mix together coconut, condensed milk, cherries and food color (if using) spread evenly over the hot base and return to oven for a further 15 minutes.
Chocolate Topping:
- Place chocolate and butter in a microwave safe bowl. Microwave for 20 seconds on high, stir and repeat. Microwave the chocolate in 3 x 20-second intervals, stirring between each. Allow to stand for a few minutes. Stir again. If the chocolate has not totally melted. Try another 10 seconds in the microwave. Be careful not to overheat or you will burn the chocolate.
- Spread over slightly warm bar – the warmth of the filling will help you spread the chocolate topping
- Allow the chocolate topping to set but not harden completely or it will be hard to cut into neat squares. You can cool the slice in the refrigerator until just set or leave at room temperature overnight to set. Cut into 30 squares.
Notes
- Self raising flour can be substituted with 1 cup of all purpose flour plus 2 teaspoons baking powder.
- I use “chocolate ripple” cookies which can be found in Australian supermarkets. However use your favorite cocoa cookie. Alternatively any plain sweet cookie can be used. Your base will simply be a little less chocolatey.
- Be sure to use unsweetened desiccated coconut not sweetened.
- Glace cherries are also known as Candied cherries. These are found in the baking aisle of the supermarket. If you can’t find them, ask a store employee to help.
- 1 tablespoon of oil can be used instead of butter in the chocolate topping.
- Allow to set until firm but not hard before cutting into squares.
Nutritional Estimate Per Serving
Nutritional Disclaimer
Nutritional information is an estimate provided by an online nutrition calculator. For accurate results, it is recommended that the nutritional information be calculated based on the ingredients and brands you use.
This updated post was first published on 10 March 2010

What a great recipe, definitely worth a try, thanks for sharing!
xx
Lisa – Space and Life Style Blog
Definitely try it, Lisa and let me know what you think. xx
wow! These look wonderful. Plus it’s one of my favorite flavor combinations! How sweet are these? And could they be made a little less sweet?
Hi Mimi! Me too, I absolutely love chocolate and cherries! Yes, they are sweet. I don’t think they are overly sweet. However you could cut back the sweetness by using less sugar in the base or even substituting the base with one that you like. The filling needs sweetened condensed milk to work so that can’t be substituted. Be sure not to use sweetened desiccated coconut then it would be way too sweet. I do think that the dark chocolate counters a bit of the sweetness. Let me know how it turns out for you xx
I wish I had some of this in my fridge!! This looks delicious Marcellina!! I could eat so much of this!!
I wish I had some of this in my fridge!! This looks delicious Marcellina!! I wish I had some in my fridge for after dinner!!!
This looks so appetising! Plus cherries are a fave! Looking forward to try this one, thanks Marcellina!
You’re welcome, Lee-Ann! I think you will enjoy this one! xx
Such a delicious looking recipe, Marcella! Love your take on the classic Cherry Ripe and to be honest, I waaay prefer your option to Cadbury’s one!
Marcellina, I’ve never seen a Cherry Ripe bar – what have I been missing?! This slice looks wonderful. The combination of chocolate and coconut is so good. Add cherries and it’s even better! Yum! I’m so drooling over these!
Omg! Yes, you have been missing out! Cherry Ripe bars are fantastic! If you ever get the chance you must try them.
Chocolate and cherries are such a good combination, your slice sounds great.
True! A classic combination.
What a great recipe!! I'd love to try it. I love cherry ripes and would love to make a slice like it.
Yum! These sound great. They remind me a lot of Nanaimo bars. I love the use of coconut in desserts.
Cherry ripe is one of my Mum's favourite chocolate bars. She'll be thrilled to see me make these.
These are beautiful.. and I couldn't imagine anything more tasty than cherries, coconut and chocolate! Yum!
man o man- these look GREAT!!
Mmmmmm, looks really good! Kind of like Nainamo bars, but better since chocolate and cherries are so great together!